
 Spring
Spring
官网
Spring官网:http://www.spring.io/
所需依赖
<dependency>
    <groupId>org.springframework</groupId>
    <artifactId>spring-context</artifactId>
    <version>5.2.10.RELEASE</version>
</dependency>
使用要求
JDK版本至少是JDK8以上
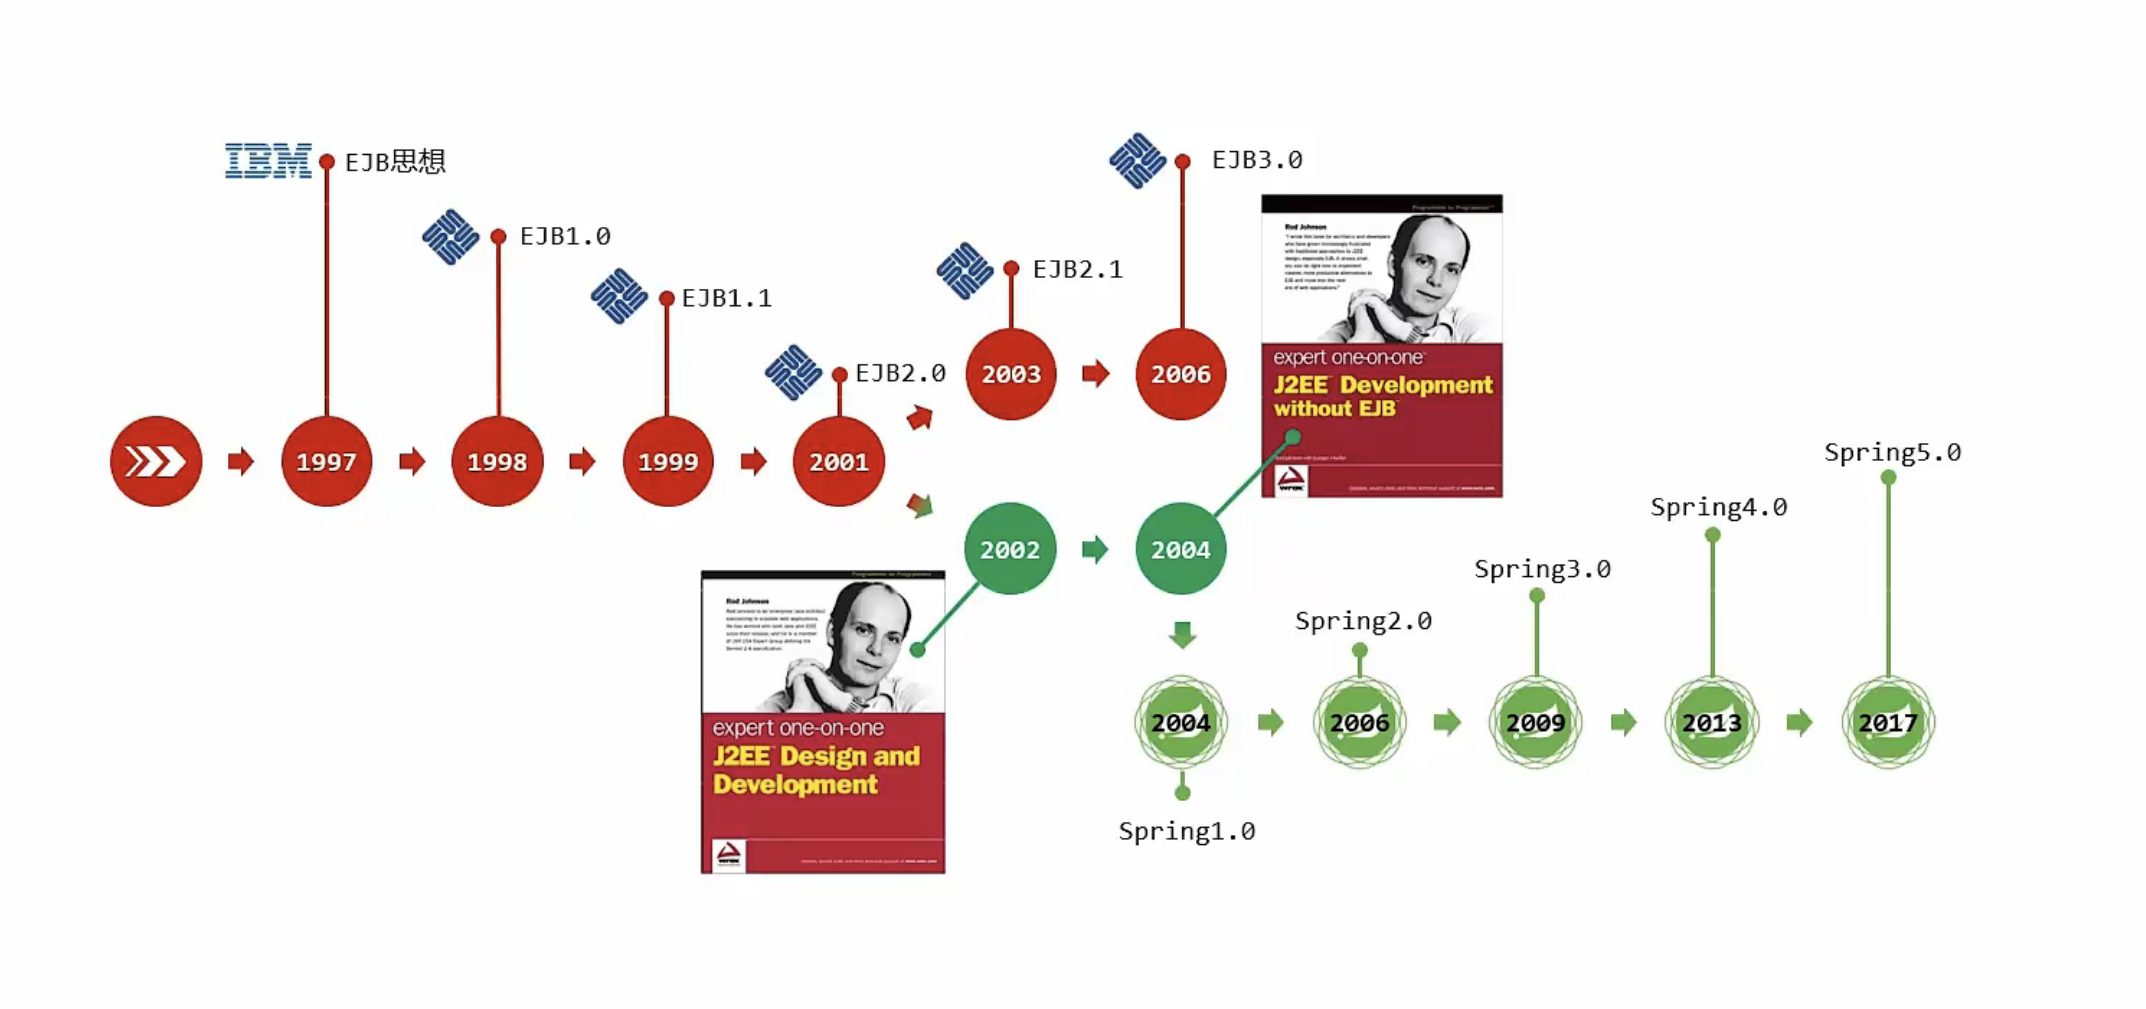
Spring诞生史
Spring FrameWork系统架构
Spring FrameWork是Spring生态圈中最基础的项目,是其它项目的根基。
FrameWork系统架构上层是依赖下层的
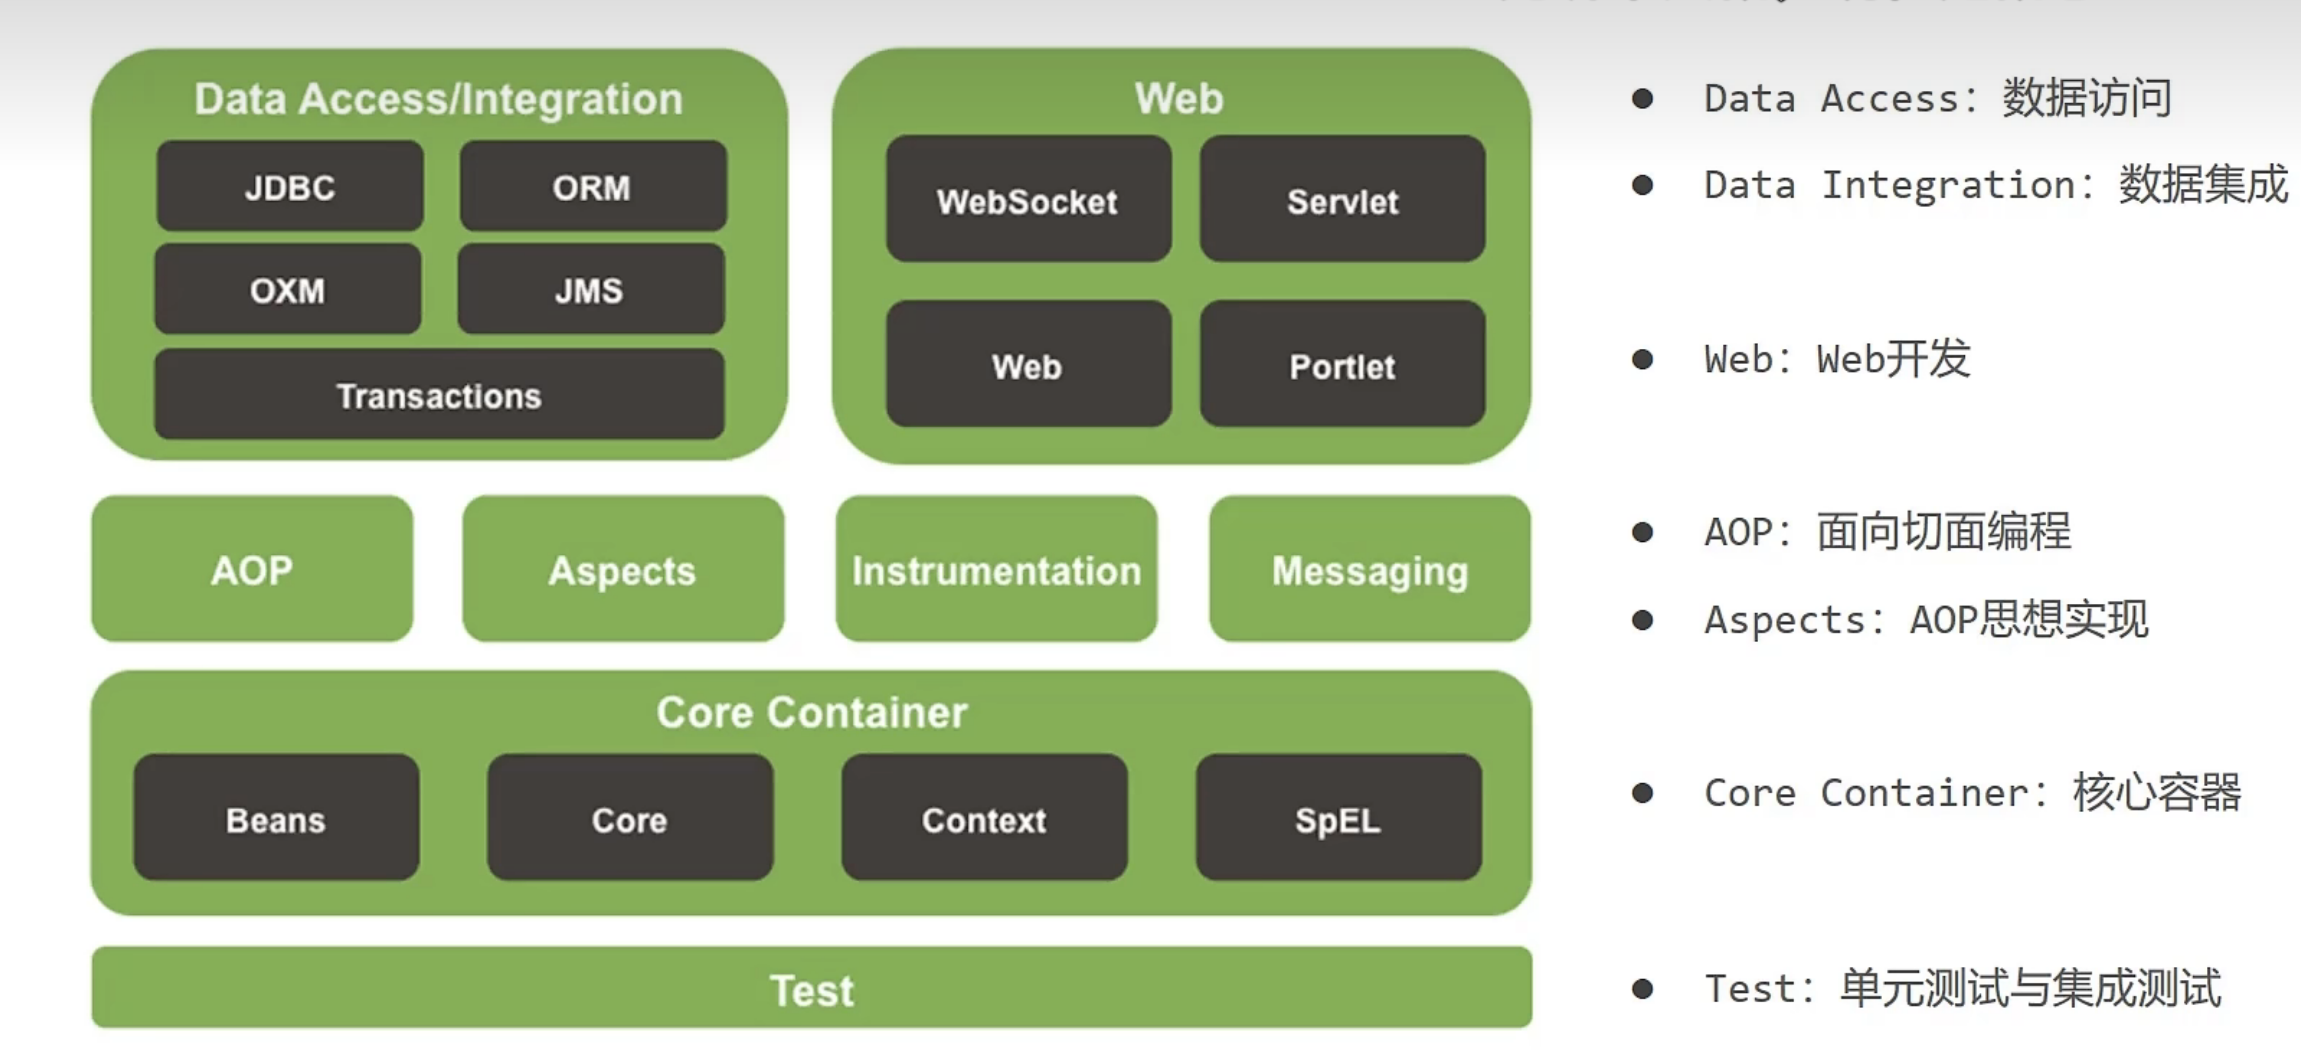
核心容器管理对象,数据集成就是可以引入别的框架如Mybatis框架。Transactions事务管理。
SSM框架
SSM框架是Spring、Spring MVC 、和Mybatis框架的整合,是标准的MVC模式。标准的SSM框架有四层,分别是dao层(mapper),service层,controller层和View层。使用Spring实现业务对象管理,使用Spring MVC负责请求的转发和视图管理,Mybatis作为数据对象的持久化引擎。
持久层 Mapper
作用:主要是做数据持久层的工作,负责与数据库进行联络的一些任务都封装在此。
- Dao层首先设计的是接口,然后再Spring的配置文件中定义接口的实现类。
- 然后可以在模块中进行接口的调用来进行数据业务的处理。(不关心接口的实现类是哪个类)
- 数据源的配置以及有关数据库连接的参数都在Spring的配置文件中进行配置。
业务层 Service
作用:Service层主要负责业务模块的逻辑应用设计。
- 先设计接口然后再设计实现类,然后再在Spring的配置文件中配置其实现的关联。(业务逻辑层的实现具体要调用到自己已经定义好的Dao的接口上)这样就可以在应用中调用Service接口来进行业务处理。
- 建立好Dao之后再建立service层,service层又要在controller层之下,因为既要调用Dao层的接口又要提供接口给controller层。每个模型都有一个service接口,每个接口分别封装各自的业务处理的方法。
表现层 Controller
作用:负责具体的业务模块流程的控制。
- 配置也同样是在Spring的配置文件里面进行,
- 调用Service层提供的接口来控制业务流程。
- 业务流程的不同会有不同的控制器,在具体的开发中可以将我们的流程进行抽象的归纳,设计出可以重复利用的子单元流程模块。
视图层 View
作用:主要和控制层紧密结合,主要负责前台页面的表示。
Spring 特点
简化开发,降低企业级开发的复杂性
框架整合。高效整合其他技术,提高企业级应用开发与运行效率
IOC 控制反转
传统书写代码现状
使用new来创建对象代码耦合度高,一旦代码需要改动则需要重新编译测试部署。
解决方案
使用对象时,在程序中不要主动使用new创建对象,转化为外部提供对象
IOC 控制反转
对象的创建控制权由程序转移到IOC容器,这种思想就是控制反转。IOC容器负责对象的创建、初始化等一系列工作,被创建或被管理的对象在IOC容器中统称为Bean。
入门案例
创建Maven项目
在pom.xml中导入Spring依赖
<dependency>
    <groupId>org.springframework</groupId>
    <artifactId>spring-context</artifactId>
    <version>5.2.10.RELEASE</version>
</dependency>
在resources目录下创建applicationContext.xml文件
<?xml version="1.0" encoding="UTF-8"?>
<beans xmlns="http://www.springframework.org/schema/beans"
       xmlns:xsi="http://www.w3.org/2001/XMLSchema-instance"
       xsi:schemaLocation="http://www.springframework.org/schema/beans http://www.springframework.org/schema/beans/spring-beans.xsd">

    <bean id="bookService" class="com.tensoflow.service.impl.BookServiceImpl">

    </bean>

    <bean id="bookMapper" class="com.tensoflow.Mapper.impl.BookMapperImpl">

    </bean>

</beans>
既然每一个bean代表一个对象,那么就需要有一个唯一标识id来表示这个对象
class表示这个对象在此项目中的路径位置
获取对象
package com.tensoflow;

import com.tensoflow.Mapper.BookMapper;
import org.springframework.context.ApplicationContext;
import org.springframework.context.support.ClassPathXmlApplicationContext;

public class Main {
    public static void main(String[] args) {
        // ApplicationContext是一个接口,通过xml文件来得到此对象
        ApplicationContext ac = new ClassPathXmlApplicationContext("applicationContext.xml");
        // 你想要什么对象,则使用在xml中定义的id来获取,注意要强转类型
        BookMapper bookMapper = (BookMapper)ac.getBean("bookMapper");
        // 得到对象后就可以调用方法
        bookMapper.save();
    }
}
DI 依赖注入
在容器中建立bean与bean之间的依赖关系的整个过程,称为依赖注入。如Service中需要依赖Mapper层才能正常运行。因为Service需要调用Mapper中的方法,而如果只创建Service中的对象不创建Mapper对象,显然是不能运行成功的。Service需要依赖于Mapper才能运行,而Service和Mapper都在IOC容器中,那么它自动帮你建立起这种依赖关系就叫做依赖注入。
依赖注入的四种方式
setter注入引用类型
如想在Service中注入Mapper 采用setter方式注入
- 则在Service实现类中定义一个Mapper并提供set方法
package com.tensoflow.service.impl;
import com.tensoflow.Mapper.BookMapper;
import com.tensoflow.Mapper.impl.BookMapperImpl;
import com.tensoflow.service.BookService;
/**
 * 1. @ClassDescription:
 * 2. @author: TenSoFlow
 * 3. @date: 2023年10月17日 19:16
 */
public class BookServiceImpl implements BookService {
    private BookMapper bookMapper;

    public void save() {
        System.out.println("我是Service");
        bookMapper.save();
    }

    public void setBookMapper(BookMapperImpl bookMapper) {
        this.bookMapper = bookMapper;
    }
}
- 在xml文件中
    <bean id="bookService" class="com.tensoflow.service.impl.BookServiceImpl">
		<!--property标签表示配置当前bean的属性-->
		<!--name属性表示配置哪一个具体属性 要与类中的属性名一致 此例中name为bookMapper是因为BookServiceImpl中有一个属性叫bookMapper-->
		<!--ref属性表示参照哪一个bean 此例中的ref为bookMapper是因为xml文件中有一个bean的id为bookMapper-->
        <property name="bookMapper" ref="bookMapper"></property>
    </bean>
setter注入普通类型(包括基本类型以及String)
XML文件中
<bean id="bookMapper" class="com.tensoflow.Mapper.impl.BookMapperImpl">
    <property name="username" value="TenSoFlow"/>
    <property name="connectionNum" value="100"/>
</bean>
BookMapperImpl实现类中
package com.tensoflow.Mapper.impl;
import com.tensoflow.Mapper.BookMapper;
/**
 * 1. @ClassDescription:
 * 2. @author: TenSoFlow
 * 3. @date: 2023年10月17日 19:17
 */
public class BookMapperImpl implements BookMapper {

    private int connectionNum;

    private String username;

    public void setConnectionNum(int connectionNum) {
        this.connectionNum = connectionNum;
    }

    public void setUsername(String username) {
        this.username = username;
    }

    public void save() {
        System.out.println("我是Mapper..." + connectionNum + " " + username);
    }

}
构造器注入引用类型
XML文件中
<bean id="bookService" class="com.tensoflow.service.impl.BookServiceImpl">
	<!--name属性要与类中构造器的参数名保持一致-->
	<constructor-arg name="bookMapper" ref="bookMapper"/>
</bean>
BookServiceImpl实现类中
package com.tensoflow.service.impl;
import com.tensoflow.Mapper.BookMapper;
import com.tensoflow.service.BookService;
/**
 * 1. @ClassDescription:
 * 2. @author: TenSoFlow
 * 3. @date: 2023年10月17日 19:16
 */
public class BookServiceImpl implements BookService {
    private BookMapper bookMapper;

    public BookServiceImpl(BookMapper bookMapper) {
       this.bookMapper = bookMapper;
    }

    public void save() {
        System.out.println("我是Service");
        bookMapper.save();
    }
}
构造方法注入普通类型(包括基本类型以及String)
XML文件中
<bean id="bookMapper" class="com.tensoflow.Mapper.impl.BookMapperImpl">
	<!--name属性要与类中构造器的参数名保持一致-->
	<constructor-arg name="username" value="TenSoFlow"/>
	<constructor-arg name="connectionNum" value="100"/>
</bean>

<!--上面的方式耦合度太高,构造方法中的参数名变了name属性的值也要变,延生出了下面的方式-->
<bean id="bookMapper" class="com.tensoflow.Mapper.impl.BookMapperImpl">
	<constructor-arg index="0" value="100"/>
	<constructor-arg index="1" value="TenSoFlow"/>
</bean>
<!--index = "0" 表示为构造函数中的第一个参数赋值-->
BookMapperImpl实现类中
package com.tensoflow.Mapper.impl;
import com.tensoflow.Mapper.BookMapper;
/**
 * 1. @ClassDescription:
 * 2. @author: TenSoFlow
 * 3. @date: 2023年10月17日 19:17
 */
public class BookMapperImpl implements BookMapper {

    private int connectionNum;

    private String username;

    public BookMapperImpl(int connectionNum, String username) {
        this.connectionNum = connectionNum;
        this.username = username;
    }

    public void save() {
        System.out.println("我是Mapper..." + connectionNum + " " + username);
    }

}
集合注入
XML文件中
<bean id="bookMapper" class="com.tensoflow.Mapper.impl.BookMapperImpl">
    <property name="array">
        <array>
            <value>100</value>
            <value>200</value>
            <value>300</value>
        </array>
    </property>
    <property name="list">
        <list>
            <value>Ten</value>
            <value>So</value>
            <value>Flow</value>
        </list>
    </property>
    <property name="set">
        <set>
            <value>Ten</value>
            <value>So</value>
            <value>Flow</value>
        </set>
    </property>
    <property name="map">
        <map>
            <entry key="country" value="china"/>
            <entry key="province" value="hubei"/>
            <entry key="city" value="jinzhou"/>
        </map>
    </property>
    <property name="properties">
        <props>
            <prop key="country">china</prop>
            <prop key="province">hubei</prop>
            <prop key="city">jinzhou</prop>
        </props>
    </property>
</bean>
BookMapperImpl实现类中
package com.tensoflow.Mapper.impl;
import com.tensoflow.Mapper.BookMapper;
import java.util.*;
/**
 * 1. @ClassDescription:
 * 2. @author: TenSoFlow
 * 3. @date: 2023年10月17日 19:17
 */
public class BookMapperImpl implements BookMapper {
    private int[] array;

    private List<String> list;

    private Set<String> set;

    private Map<String,String> map;

    private Properties properties;

    public void setArray(int[] array) {this.array = array;}

    public void setList(List<String> list) {this.list = list;}

    public void setSet(Set<String> set) {this.set = set;}

    public void setMap(Map<String, String> map) {this.map = map;}

    public void setProperties(Properties properties) {this.properties = properties;}

    public void save() {
        System.out.println(Arrays.toString(array));
        System.out.println(list);
        System.out.println(set);
        System.out.println(map);
        System.out.println(properties);
    }
}
自动装配
自动装配用于引用类型依赖注入,不能对简单类型进行操作。
使用按类型( byType )装配时必须保障容器中相同类型的bean唯一,推荐使用。
使用按名称( byName )装配时必须保障容器中具有指定名称的bean,因变量名与配置耦合,不推荐使用。
自动装配优先级低于setter注入与构造器注入,同时出现时自动装配配置失效。
按类型
XML文件中
<bean id="bookService" class="com.tensoflow.service.impl.BookServiceImpl" autowire="byType"/>
BookServiceImpl类中
为注入的属性要提供set方法
package com.tensoflow.service.impl;

import com.tensoflow.Mapper.BookMapper;
import com.tensoflow.Mapper.impl.BookMapperImpl;
import com.tensoflow.service.BookService;
/**
 * 1. @ClassDescription:
 * 2. @author: TenSoFlow
 * 3. @date: 2023年10月17日 19:16
 */
public class BookServiceImpl implements BookService {
    private BookMapper bookMapper;

    public void setBookMapper(BookMapper bookMapper) {
        this.bookMapper = bookMapper;
    }

    public void save() {
        System.out.println("我是Service");
        bookMapper.save();
    }
}
按名称
XML文件中
<bean id="bookService" class="com.tensoflow.service.impl.BookServiceImpl" autowire="byName"/>
<bean id="bookMapper" class="com.tensoflow.Mapper.impl.BookMapperImpl"/>
BookServiceImpl类中
bean中的id名要与类中的属性名一样
package com.tensoflow.service.impl;

import com.tensoflow.Mapper.BookMapper;
import com.tensoflow.Mapper.impl.BookMapperImpl;
import com.tensoflow.service.BookService;
/**
 * 1. @ClassDescription:
 * 2. @author: TenSoFlow
 * 3. @date: 2023年10月17日 19:16
 */
public class BookServiceImpl implements BookService {
    private BookMapper bookMapper;

    public void setBookMapper(BookMapper bookMapper) {
        this.bookMapper = bookMapper;
    }

    public void save() {
        System.out.println("我是Service");
        bookMapper.save();
    }
}
Bean
Bean的别名
为Bean起别名的目的就是每个人的取名习惯不同,所以支持一个bean有多个名字,name属性中的别名可以有多个,之间用空格隔开。
<bean id="bookMapper" name="mapper dao" class="com.tensoflow.Mapper.impl.BookMapperImpl">

</bean>
Bean的单例
Spring Bean中创建的对象默认是单例的,即创建出来的对象都是同一个。
创建多例的方法如下
<bean id="bookMapper" class="com.tensoflow.Mapper.impl.BookMapperImpl" scope="prototype">

</bean>
为其添加scope属性,其属性值有两个一个是prototype表示多例,一个是singleton表示单例,不写默认是singleton。
问:为什么Bean要设计成单例?
答:资源利用效率:单例模式可以节省系统资源,避免重复创建和销毁对象。当一个对象被多次请求时,只需要创建一次实例并重复使用,提高了系统的资源利用效率。对象一致性:对于某些需要保持一致状态或共享数据的对象,使用单例模式可以确保全局只有一个实例。这样可以避免多个实例之间的数据不一致性问题,简化了数据管理和同步的复杂性。全局访问性:单例模式使得对象在整个应用程序的上下文中可被访问。这对于需要在不同的组件或模块中共享数据或提供共享服务的对象非常有用。配置和管理简便性:在Spring框架中,Bean的单例模式使得对象的创建、依赖注入和生命周期管理更加简便。通过Spring容器的管理,可以统一配置和管理Bean的创建和销毁过程。
小贴士
既然Bean默认是单例的那么哪些交给Bean容器管理比较好的?一般是哪些每次创建只会用到一次的类。如表现层对象,业务层对象,数据层对象,工具对象。而封装实体的域对象(pojo类)不适合交给Bean管理,因为一般都会创建多个不同的对象。
Bean实例化
Bean本质上是通过无参构造方法创建出来的,如果你写的无参构造方法中有打印,Bean创建对象的同时会执行此无参构造方法。值得注意的是如果你的构造方法是私有的,Bean也能调用无参构造方法。其底层是反射。
Bean生命周期
生命周期指的是从创建到消亡的过程、
配置创建对象时的初始方法和摧毁之前的摧毁方法有XML配置方式和实现接口的方式
XML方式
BookMapperImpl类中
package com.tensoflow.Mapper.impl;
import com.tensoflow.Mapper.BookMapper;
/**
 * 1. @ClassDescription:
 * 2. @author: TenSoFlow
 * 3. @date: 2023年10月17日 19:17
 */
public class BookMapperImpl implements BookMapper {
    public void save() {
        System.out.println("我是Mapper");
    }
    public void init() {
        System.out.println("init....");
    }
    public void destroy() {
        System.out.println("destroy...");
    }
}
XML文件中
<bean id="bookMapper" class="com.tensoflow.Mapper.impl.BookMapperImpl" init-method="init" destroy-method="destroy">

</bean>
init-method要与类中的一个方法对应意思就是指定该方法为Bean创建实例时的方法,destroy-method也是
实现接口方式
BookMapperImpl类中实现InitializingBean, DisposableBean接口
package com.tensoflow.Mapper.impl;

import com.tensoflow.Mapper.BookMapper;
import org.springframework.beans.factory.DisposableBean;
import org.springframework.beans.factory.InitializingBean;

/**
 * 1. @ClassDescription:
 * 2. @author: TenSoFlow
 * 3. @date: 2023年10月17日 19:17
 */
public class BookMapperImpl implements BookMapper, InitializingBean, DisposableBean {
    public void save() {
        System.out.println("我是Mapper");
    }

    @Override
    public void destroy() throws Exception {
        System.out.println("destroy...");
    }

	// 此方法名为afterPropertiesSet其在属性赋值即set方法之后才运行
    @Override
    public void afterPropertiesSet() throws Exception {
        System.out.println("init...");
    }
}
第三方数据源Bean管理
Druid简介
Druid首先是一个数据库连接池。Druid是目前最好的数据库连接池,在功能、性能、扩展性方面,都超过其他数据库连接池,包括DBCP、C3P0、BoneCP、Proxool、JBoss DataSource。Druid已经在阿里巴巴部署了超过600个应用,经过一年多生产环境大规模部署的严苛考验。Druid是阿里巴巴开发的号称为监控而生的数据库连接池!
Druid功能
充当数据库连接池。
可以监控数据库访问性能
获得SQL执行日志
Druid依赖
<dependency>
	<groupId>com.alibaba</groupId>
	<artifactId>druid</artifactId>
	<version>1.1.16</version>
</dependency>
Druid使用
<bean id="dataSource" class="com.alibaba.druid.pool.DruidDataSource">
	<property name="username" value="root"/>
	<property name="password" value="123456"/>
	<property name="url" value="jdbc:mysql://localhost:3306/spring_db"/>
	<property name="driverClassName" value="com.mysql.jdbc.Driver"/>
</bean>
ApplicationContext ac = new ClassPathXmlApplicationContext("applicationContext.xml");
DataSource dataSource = (DataSource)ac.getBean("dataSource");
System.out.println(dataSource);
创建容器
// 方式一:类路径加载配置文件
ApplicationContext ctx = new ClassPathXmlApplicationContext("applicationContext.xml");

// 方式二:文件路径加载配置文件
ApplicationContext ctx = new 		     FileSystemXmlApplicationContext("D:\\applicationContext.xml");

// 加载多个配置文件
ApplicationContext ctx = new ClassPathXmlApplicationContext("bean1.xml", "bean2.xml");
获取Bean
// 方式一:使用 bean 名称获取
BookDao bookDao = (BookDao) ctx.getBean("bookDao");

// 方式二:使用 bean 名称获取并指定类型
BookDao bookDao = ctx.getBean("bookDao", BookDao.class);

// 方式三:使用 bean 类型获取
BookDao bookDao = ctx.getBean(BookDao.class);
Bean总结

Properties文件
目的就是解耦,对于配置数据库用户名密码等信息,如果写在xml文件中,想要改动就要停止项目,而写在Properties文件中就不需要停止项目,xml文件可以引入Properties文件中的值。
使用步骤
在resources目录下创建jdbc.properties文件
jdbc.url = jdbc:mysql://localhost:3306/spring_db
jdbc.username = root
jdbc.password = 123456
jdbc.driverClassName = com.mysql.jdbc.Driver
变量名不要写username应该在前面加一个前缀,因为username会和系统环境变量冲突
修改xml文件
<?xml version="1.0" encoding="UTF-8"?>
<beans xmlns="http://www.springframework.org/schema/beans"
       xmlns:xsi="http://www.w3.org/2001/XMLSchema-instance"
       <!--1.开启context命名空间-->
       xmlns:context="http://www.springframework.org/schema/context"
       xsi:schemaLocation="
       http://www.springframework.org/schema/beans
       http://www.springframework.org/schema/beans/spring-beans.xsd
       <!--1.开启context命名空间-->
       http://www.springframework.org/schema/context
       http://www.springframework.org/schema/context/spring-context.xsd
        ">

    <bean id="bookService" class="com.tensoflow.service.impl.BookServiceImpl" autowire="byName"/>

    <!--2.使用context空间加载所有properties文件-->
    <context:property-placeholder location="classpath*:*.properties"/>
    <!--3.使用属性占位符${}读取properties文件中的属性-->
    <bean id="dataSource" class="com.alibaba.druid.pool.DruidDataSource">
        <property name="username" value="${username}"/>
        <property name="password" value="${password}"/>
        <property name="url" value="${url}"/>
        <property name="driverClassName" value="${driverClassName}"/>
    </bean>
</beans>
如何加载多个properties文件
<!-- 不加载系统属性 -->
<context:property-placeholder location="jdbc.properties" system-properties-mode="NEVER"/>

<!-- 加载多个properties文件 -->
<context:property-placeholder location="jdbc.properties,msg.properties"/>

<!-- 加载所有properties文件 -->
<context:property-placeholder location="*.properties"/>

<!-- 加载properties文件标准格式 -->
<context:property-placeholder location="classpath:*.properties"/>

<!-- 从类路径或jar包中搜索并加载properties文件 -->
<context:property-placeholder location="classpath*:*.properties"/>
Spring 注解开发
配置XML形式
在BookMapperImpl实现类上加上@Component(组件)注解,并在XML文件中配置包扫描,扫描组件位置。
package com.tensoflow.Mapper.impl;
import com.tensoflow.Mapper.BookMapper;
import org.springframework.stereotype.Component;
/**
 * 1. @ClassDescription:
 * 2. @author: TenSoFlow
 * 3. @date: 2023年10月17日 19:17
 */
@Component("bookMapper")
public class BookMapperImpl implements BookMapper {
    public void save() {
        System.out.println("我是Mapper...");
    }
}
<?xml version="1.0" encoding="UTF-8"?>
<beans xmlns="http://www.springframework.org/schema/beans"
       xmlns:xsi="http://www.w3.org/2001/XMLSchema-instance"
       xmlns:context="http://www.springframework.org/schema/context"
       xsi:schemaLocation="
       http://www.springframework.org/schema/beans
       http://www.springframework.org/schema/beans/spring-beans.xsd
       http://www.springframework.org/schema/context
       http://www.springframework.org/schema/context/spring-context.xsd
        ">
    	<!--配置包扫描-->
        <context:component-scan base-package="com.tensoflow.Mapper.impl"/>
</beans>
为了区分业务层数据层表现层Spring提供了@Component注解的三个衍生注解
@Controller 用于表现层
@Service 用于业务层
@Repository 用于数据层
配置类形式
package com.tensoflow.Mapper.impl;
import com.tensoflow.Mapper.BookMapper;
import org.springframework.stereotype.Component;
/**
 * 1. @ClassDescription:
 * 2. @author: TenSoFlow
 * 3. @date: 2023年10月17日 19:17
 */
@Component("bookMapper")
public class BookMapperImpl implements BookMapper {
    public void save() {
        System.out.println("我是Mapper...");
    }
}
package com.tensoflow;
import com.tensoflow.Mapper.impl.BookMapperImpl;
import com.tensoflow.config.SpringConfig;
import org.springframework.context.ApplicationContext;
import org.springframework.context.annotation.AnnotationConfigApplicationContext;
public class Main {
    public static void main(String[] args) {
        ApplicationContext ac = new AnnotationConfigApplicationContext(SpringConfig.class);
        BookMapperImpl dao = (BookMapperImpl) ac.getBean("bookMapper");
        dao.save();
    }
}
package com.tensoflow.config;
import org.springframework.context.annotation.ComponentScan;
import org.springframework.context.annotation.Configuration;
/**
 * 1. @ClassDescription:
 * 2. @author: TenSoFlow
 * 3. @date: 2023年10月19日 10:46
 */
@Configuration
@ComponentScan("com.tensoflow.Mapper.impl")
public class SpringConfig {

}
@Configuration注解用于设定当前类为配置类,等同于xml文件的模板
@ComponentScan注解用于设定扫描路径,相当于在xml文件中配置包扫描,此注解只能添加一次,多个数据请用数组格式
@ComponentScan({"com.tensoflow.Mapper.impl","com.tensoflow.service.impl"})
各类注解
@Scope 作用在类上表示配置单例还是多例
@Scope("singleton") // 单例
@Scope("prototype") // 多例
@PostConstruct 作用在方法上表示在构造方法之后执行的方法
@PreDestroy 作用在方法上表示在摧毁前执行的方法
package com.tensoflow.Mapper.impl;
import com.tensoflow.Mapper.BookMapper;
import org.springframework.context.annotation.Scope;
import org.springframework.stereotype.Component;
import javax.annotation.PostConstruct;
import javax.annotation.PreDestroy;
/**
 * 1. @ClassDescription:
 * 2. @author: TenSoFlow
 * 3. @date: 2023年10月17日 19:17
 */
@Component("bookMapper")
@Scope("singleton")
public class BookMapperImpl implements BookMapper {
    public void save(){System.out.println("我是Mapper...");}
    @PostConstruct
    public void init(){System.out.println("init...");}
    @PreDestroy
    public void destroy(){System.out.println("destroy...");}
}
自动装配
@Autowired注解
package com.tensoflow.service.impl;

import com.tensoflow.Mapper.BookMapper;
import com.tensoflow.service.BookService;
import org.springframework.beans.factory.annotation.Autowired;
import org.springframework.stereotype.Service;
/**
 * 1. @ClassDescription:
 * 2. @author: TenSoFlow
 * 3. @date: 2023年10月17日 19:16
 */
@Service
public class BookServiceImpl implements BookService {
    @Autowired
    private BookMapper bookMapper;

    public void save() {
        System.out.println("我是Service");
        bookMapper.save();
    }
}
@Qualilfier注解
如果BookMapper有两个实现类就需要按名称装配
使用@Qualifier注解需要加上@Autowired注解
package com.tensoflow.service.impl;
import com.tensoflow.Mapper.BookMapper;
import com.tensoflow.service.BookService;
import org.springframework.beans.factory.annotation.Autowired;
import org.springframework.beans.factory.annotation.Qualifier;
import org.springframework.stereotype.Service;
/**
 * 1. @ClassDescription:
 * 2. @author: TenSoFlow
 * 3. @date: 2023年10月17日 19:16
 */
@Service
public class BookServiceImpl implements BookService {
    @Autowired
    @Qualifier("bookMapper")
    private BookMapper bookMapper;

    public void save() {
        System.out.println("我是Service");
        bookMapper.save();
    }
}
@Value注解
使用@Value注解为基本类型和String类型赋值
package com.tensoflow.Mapper.impl;

import com.tensoflow.Mapper.BookMapper;
import org.springframework.beans.factory.annotation.Value;
import org.springframework.stereotype.Repository;
/**
 * 1. @ClassDescription:
 * 2. @author: TenSoFlow
 * 3. @date: 2023年10月17日 19:17
 */
@Repository("bookMapper")
public class BookMapperImpl implements BookMapper {
    @Value("TenSoFlow")
    private String name;

    public void save() {
        System.out.println("我是Mapper..." + name);
    }
}
@Value注解中的值从外部Properties文件中引用
需要先创建properties文件然后在配置类上加上@PropertySource("jdbc.properties")注解然后使用${}形式引用
myName = TenSorFlow
package com.tensoflow.config;
import org.springframework.context.annotation.ComponentScan;
import org.springframework.context.annotation.Configuration;
import org.springframework.context.annotation.PropertySource;
/**
 * 1. @ClassDescription:
 * 2. @author: TenSoFlow
 * 3. @date: 2023年10月19日 10:46
 */
@Configuration
@ComponentScan("com.tensoflow")
@PropertySource("jdbc.properties")
public class SpringConfig {

}
package com.tensoflow.Mapper.impl;

import com.tensoflow.Mapper.BookMapper;
import org.springframework.beans.factory.annotation.Value;
import org.springframework.stereotype.Repository;
/**
 * 1. @ClassDescription:
 * 2. @author: TenSoFlow
 * 3. @date: 2023年10月17日 19:17
 */
@Repository("bookMapper")
public class BookMapperImpl implements BookMapper {
    @Value("${myName}")
    private String name;
    public void save() {
        System.out.println("我是Mapper..." + name);
    }
}
第三方Bean的注解管理
package com.tensoflow.config;

import com.alibaba.druid.pool.DruidDataSource;
import org.springframework.context.annotation.Bean;
import org.springframework.context.annotation.ComponentScan;
import org.springframework.context.annotation.Configuration;
import org.springframework.context.annotation.PropertySource;

import javax.activation.DataSource;

/**
 * 1. @ClassDescription:
 * 2. @author: TenSoFlow
 * 3. @date: 2023年10月19日 10:46
 */
@Configuration
public class SpringConfig {
    // @Bean注解表示方法的返回值作为一个Bean
    @Bean
    public DataSource dataSource() {
        DruidDataSource ds = new DruidDataSource();
        ds.setUrl("jdbc:mysql://localhost:3306/spring_db");
        ds.setUsername("root");
        ds.setPassword("123456");
        ds.setDriverClassName("com.mysql.jdbc.Drive");
        return (DataSource) ds;
    }
}
配置类分开写
package com.tensoflow.config;

import com.alibaba.druid.pool.DruidDataSource;
import org.springframework.context.annotation.Bean;
import org.springframework.context.annotation.ComponentScan;
import org.springframework.context.annotation.Configuration;
import org.springframework.context.annotation.PropertySource;
import javax.activation.DataSource;
/**
 * 1. @ClassDescription:
 * 2. @author: TenSoFlow
 * 3. @date: 2023年10月19日 10:46
 */
public class JdbcConfig {
    // @Bean注解表示方法的返回值作为一个Bean
    @Bean
    public DataSource dataSource() {
        DruidDataSource ds = new DruidDataSource();
        ds.setUrl("jdbc:mysql://localhost:3306/spring_db");
        ds.setUsername("root");
        ds.setPassword("123456");
        ds.setDriverClassName("com.mysql.jdbc.Drive");
        return (DataSource) ds;
    }
}
package com.tensoflow.config;
import org.springframework.context.annotation.ComponentScan;
import org.springframework.context.annotation.Configuration;
import org.springframework.context.annotation.PropertySource;
/**
 * 1. @ClassDescription:
 * 2. @author: TenSoFlow
 * 3. @date: 2023年10月19日 10:46
 */
@Configuration
@Import({JdbcConfig.class})
public class SpringConfig {

}
AOP 面向切面编程
OOP面向对象编程是一种编程思想,指导开发者去创建对象和类。
AOP面向切面编程也是一种编程思想,一种编程范式,指导开发者如何组织程序结构。底层是代理模式
作用
在不惊动原始设计的基础上为其进行功能增强
核心概念
连接点(JoinPoint): 程序执行过程中的任意位置,粒度为执行方法、抛出异常、设置变量等
- 在SpringAOP中,理解为方法的执行
切入点(Pointcut): 匹配连接点的式子
- 在SpringAOP中,一个切入点可以只描述一个具体方法,也可以匹配多个方法
- 一个具体方法: com.tensoflow.dao包下的BookDao接口中的无形参无返回值的save方法
- 匹配多个方法: 所有的save方法,所有的get开头的方法,所有以Dao结尾的接口中的任意方法,所有带有一个参数的方法
通知(Advice): 在切入点处执行的操作,也就是共性功能
- 在SpringAOP中,功能最终以方法的形式呈现
通知类: 定义通知的类
切面(Aspect): 描述通知与切入点的对应关系
需要增强的方法叫切入点,增强的方法叫通知,如果通知有很多,切入点不知道要用哪一个通知,此时出现了切面,就是把切入点和其需要的通知绑定起来。通知可以有很多,并且都是一个一个的方法,把它们写在一个类中,这个类就叫通知类。
所需依赖
需要aop和aspectjweaver的包,spring-context中包含aop,所以导入spring-context包和aspectjweaver包即可
<dependency>
    <groupId>org.springframework</groupId>
    <artifactId>spring-context</artifactId>
    <version>5.2.10.RELEASE</version>
</dependency>

<dependency>
    <groupId>org.aspectj</groupId>
    <artifactId>aspectjweaver</artifactId>
    <version>1.9.4</version>
</dependency>
案例
package com.tensoflow.aop;
import org.aspectj.lang.annotation.Aspect;
import org.aspectj.lang.annotation.Before;
import org.aspectj.lang.annotation.Pointcut;
import org.springframework.stereotype.Component;
/**
 * 1. @ClassDescription:
 * 2. @author: TenSoFlow
 * 3. @date: 2023年10月19日 16:22
 */
@Component
@Aspect
public class MyAdvice {
    // 引号里面的内容是切入点表达式
    @Pointcut("execution(void com.tensoflow.Mapper.BookMapper.update())")
    private void pt(){}

    @Before("pt()")
    public void method() {
        System.out.println(System.currentTimeMillis());
    }
}
package com.tensoflow.config;
import com.alibaba.druid.pool.DruidDataSource;
import org.springframework.context.annotation.*;
import javax.activation.DataSource;
/**
 * 1. @ClassDescription:
 * 2. @author: TenSoFlow
 * 3. @date: 2023年10月19日 10:46
 */
@Configuration
@ComponentScan("com.tensoflow")
@EnableAspectJAutoProxy
public class SpringConfig {

}
package com.tensoflow.Mapper;
public interface BookMapper {
    void save();
    void update();
}
package com.tensoflow.Mapper.impl;
import com.tensoflow.Mapper.BookMapper;
import org.springframework.beans.factory.annotation.Value;
import org.springframework.stereotype.Component;
import org.springframework.stereotype.Repository;
/**
 * 1. @ClassDescription:
 * 2. @author: TenSoFlow
 * 3. @date: 2023年10月17日 19:17
 */
@Repository
public class BookMapperImpl implements BookMapper {
    public void save() {
        System.out.println(System.currentTimeMillis());
        System.out.println("我是Mapper...");
    }

    public void update() {
        System.out.println("update...");
    }
}
切入点表达式
// 切入点表达式标准格式:动作关键字 (访问修饰符 返回值 包名.类/接口名.方法名 (参数) 异常名)
示例:execution (public User com.tensoflow.service.UserService.findById (int))

// 动作关键字: 描述切入点的行为动作,例如 execution 表示执行到指定切入点。
// 访问修饰符: public、private 等,可以省略。
// 返回值
// 包名
// 类/接口名
// 方法名
// 参数
// 异常名:方法定义中抛出指定异常,可以省略
AOP通知类型
package com.tensoflow.aop;

import org.aspectj.lang.ProceedingJoinPoint;
import org.aspectj.lang.annotation.*;
import org.springframework.stereotype.Component;
/**
 * 1. @ClassDescription:
 * 2. @author: TenSoFlow
 * 3. @date: 2023年10月19日 16:22
 */
@Component
@Aspect
public class MyAdvice {
    @Pointcut("execution(void com.tensoflow.Mapper.BookMapper.update())")
    private void pt(){}

    // 前置通知
    @Before("pt()")
    public void before() {
        System.out.println("before");
    }

    // 后置通知
    @After("pt()")
    public void after() {
        System.out.println("after");
    }

    // 环绕通知
    @Around("pt()")
    public Object around(ProceedingJoinPoint pjp) throws Throwable {
        Signature signature = pjp.getSignature();
        // 得到原始方法的包路径
        String className = signature.getDeclaringTypeName();
        // 得到原始方法的方法名
        String method = signature.getName();

        System.out.println(className);
        System.out.println(method);

        System.out.println("原始操作之前");
        // 调用原始操作
        Object proceed = pjp.proceed();
        System.out.println("原始操作之后");
        return proceed;
    }

    // 方法运行之后没有抛异常才会运行
    @AfterReturning("pt()")
    public void afterReturning() {
        System.out.println("afterReturning");
    }

    // 方法运行之后抛出异常才运行
    @AfterThrowing("pt()")
    public void afterThrowing() {
        System.out.println("afterThrowing");
    }
}
AOP通知获取参数
解决获取原始方法的参数
package com.tensoflow.aop;

import org.aspectj.lang.JoinPoint;
import org.aspectj.lang.ProceedingJoinPoint;
import org.aspectj.lang.Signature;
import org.aspectj.lang.annotation.*;
import org.springframework.stereotype.Component;
import java.util.Arrays;

/**
 * 1. @ClassDescription:
 * 2. @author: TenSoFlow
 * 3. @date: 2023年10月19日 16:22
 */
@Component
@Aspect
public class MyAdvice {
    @Pointcut("execution(void com.tensoflow.Mapper.BookMapper.update())")
    private void pt(){}

    // 前置通知
    @Before("pt()")
    public void before(JoinPoint jp) {
        // 原始方法的参数保存在JoinPoint中通过getArgs获取,会把参数封装成Object数组
        // 第一个参数值对应args[0]
        Object[] args = jp.getArgs();
        System.out.println(Arrays.toString(args));

        System.out.println("before");
    }
}
事务
作用
在数据层保障一系列的数据库操作同时成功同时失败
Spring事务作用:在数据层或业务层保障一系列的数据库操作同时成功同时失败
所需依赖
<dependency>
    <groupId>org.springframework</groupId>
    <artifactId>spring-tx</artifactId>
    <version>5.3.9</version>
</dependency>
<dependency>
    <groupId>org.springframework</groupId>
    <artifactId>spring-jdbc</artifactId>
    <version>5.3.9</version>
</dependency>
<dependency>
    <groupId>mysql</groupId>
    <artifactId>mysql-connector-java</artifactId>
    <version>8.0.26</version>
</dependency>
使用方式
一般在接口方法上加上@Transactional注解
package com.tensoflow.config;
import com.alibaba.druid.pool.DruidDataSource;
import org.springframework.context.annotation.*;
import org.springframework.jdbc.datasource.DataSourceTransactionManager;
import org.springframework.transaction.PlatformTransactionManager;
import org.springframework.transaction.annotation.EnableTransactionManagement;
import javax.activation.DataSource;
/**
 * 1. @ClassDescription:
 * 2. @author: TenSoFlow
 * 3. @date: 2023年10月19日 10:46
 */
@Configuration
@ComponentScan("com.tensoflow")
@EnableTransactionManagement
public class SpringConfig {

    @Bean
    public DataSource dataSource() {
        DruidDataSource ds = new DruidDataSource();
        ds.setUrl("jdbc:mysql://localhost:3306/spring_db");
        ds.setUsername("root");
        ds.setPassword("123456");
        ds.setDriverClassName("com.mysql.jdbc.Drive");
        return (DataSource) ds;
    }

    @Bean
    public PlatformTransactionManager transactionManager(DataSource dataSource) {
        DataSourceTransactionManager transactionManager = new DataSourceTransactionManager();
        transactionManager.setDataSource(dataSource);
        return transactionManager;
    }

}
package com.tensoflow.service;
import org.springframework.transaction.annotation.Transactional;
public interface BookService {
    @Transactional
    void transfer(String our,String in,Double money);
}
事务角色
事务管理员:发起事务方,在Spring中通常指代业务层开启事务的方法。
事务协调员:加入事务方,在Spring中通常指代数据层方法,也可以是业务层方法。
事务属性
能加在@Transactional注解上的属性
如@Transactional(rollbackFor = {IOException.class}) 遇到IO异常就回滚
| 属性 | 作用 | 示例 |
|---|---|---|
| readOnly | 设置是否为只读事务 | readOnly=true 只读事务 |
| timeout | 设置事务超时时间 | timeout = -1 (永不超时) |
| rollbackFor | 设置事务回滚异常 (class) | rollbackFor = {NullPointException.class} |
| rollbackForClassName | 设置事务回滚异常 (String) | 同上格式为字符串 |
| noRollbackFor | 设置事务不回滚异常 (class) | noRollbackFor = {NullPointException.class} |
| noRollbackForClassName | 设置事务不回滚异常 (String) | 同上格式为字符串 |
| propagation | 设置事务传播行为 | …… |