
 Java高级技术
Java高级技术
第01章 IO流
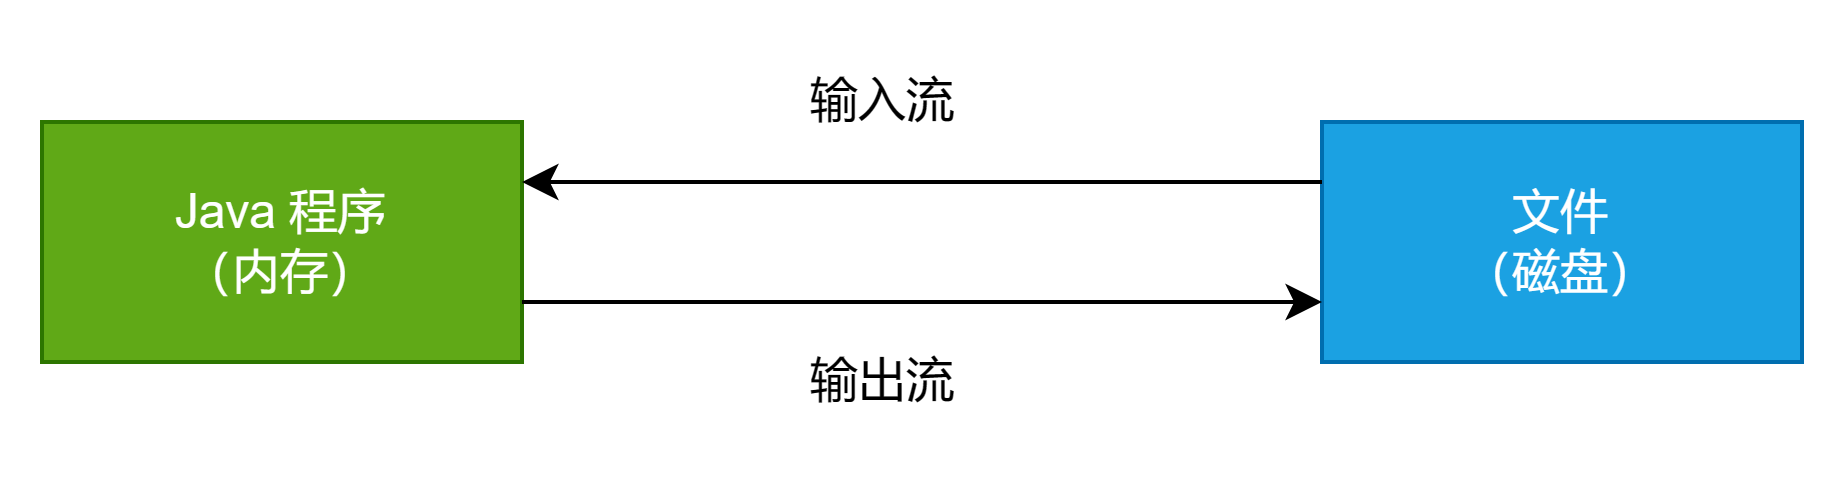
字节流:InputStream OutputStream (按字节的方式,所以适合二进制文件,如音频文件、视频文件、图片文件、数据库文件)
字符流:Reader Writer (按字符的方式,所以适合文本文件如txt文件)
以上四个都是抽象类
文件创建
方式一
String Path = "D:\\Cao1.txt";
File file = new File(Path);
try {
    file.createNewFile();
    System.out.println("文件创建成功");
} catch (IOException e)  {
    System.out.println("文件创建失败");
}
方式二
File parentFile = new File("D:\\");
String fileName = "Cao2.txt";
File file = new File(parentFile,fileName);
try {
    file.createNewFile();
    System.out.println("文件创建成功");
} catch (IOException e) {
    System.out.println("文件创建失败");
}
方式三
String parentPath = "D:\\";
String filePath = "Cao3.txt";
File file = new File(parentPath,filePath);
try {
    file.createNewFile();
    System.out.println("文件创建成功");
} catch (IOException e) {
    System.out.println("文件创建失败");
}
文件对象的相应方法
File file = new File("D:\\Cao1.txt");
System.out.println("文件的绝对路径 = " + file.getAbsolutePath());// D:\\Cao1.txt
System.out.println("文件的父级目录 = " + file.getParent());// D:\
System.out.println("文件的大小(字节) = " + file.length()); // 0
System.out.println("文件是否存在 = " + file.exists()); // true
System.out.println("是不是一个文件 = " + file.isFile()); // true
System.out.println("是不是一个目录 = " + file.isDirectory()); // false
目录创建
//判断 D:\\demo\\a\\b\\c 目录是否存在,如果存在就提示已经存在,否则就创建
String filePath = "D:\\demo\\a\\b\\c";
File file = new File(filePath);
if(file.exists()) {
    System.out.println(filePath + "存在...");
} else {
    if(file.mkdirs()) {
        System.out.println("创建成功");
    } else {
        System.out.println("创建失败");
    }
}
创建多级目录用mkdirs() 单级目录用mkdir()
文件删除
//判断 D:\\Cao1.txt 是否存在,如果存在则删除
String filePath = "D:\\Cao1.txt";
File file = new File(filePath);
if(file.exists()) {
    if(file.delete()) {
        System.out.println("删除成功");
    } else {
        System.out.println("删除失败");
    }
} else {
    System.out.println("文件不存在");
}
文件读取
读取文件中的内容到Java控制台
package org.example;
import java.io.FileInputStream;
import java.io.IOException;
public class ReadFile {
    public static void main(String[] args) {
        //从文件中读取内容到Java控制台 此方法txt文件中如果有中文有可能会出现乱码
        String filePath = "D:\\Cao2.txt";
        FileInputStream fileInputStream = null;
        byte[] buf = new byte[8];
        int readLen = 0;
        try {
            //读取文件
            fileInputStream = new FileInputStream(filePath);
            //返回-1表示读取完毕
            while((readLen = fileInputStream.read(buf)) != -1) {
                System.out.print(new String(buf,0,readLen));
            }
        } catch (IOException e) {
            throw new RuntimeException(e);
        } finally {
            try {
                if (fileInputStream != null) {
                    fileInputStream.close();
                }
            } catch (IOException e) {
                throw new RuntimeException(e);
            }
        }
    }
}
文件写入
写内容到txt文件中
package org.example;
import java.io.FileOutputStream;
import java.io.IOException;
public class WriteFile {
    public static void main(String[] args) {
        //使用FileOutPutStream 将数据写到文件中,如果该文件不存在,则创建文件
        String filePath = "D:\\Cao1.txt";
        FileOutputStream fileOutputStream = null;
        try {
            fileOutputStream = new FileOutputStream(filePath);
            fileOutputStream.write("CaoWeiMin".getBytes());
        } catch (IOException e) {
            throw new RuntimeException(e);
        } finally {
            try {
                if (fileOutputStream != null) {
                    fileOutputStream.close();
                }
            } catch (IOException e) {
                throw new RuntimeException(e);
            }
        }
    }
}
覆盖方式写入:fileOutputStream = new FileOutputStream(filePath)
追加方式写入:fileOutputStream = new FileOutputStream(filePath,true)
文件拷贝
package org.example;
import java.io.FileInputStream;
import java.io.FileOutputStream;
import java.io.IOException;
public class CopyFile {
    public static void main(String[] args) {
        //将D盘的文件蛋糕.ico Copy到E盘 蛋糕.ico
        String filePath = "D:\\蛋糕.ico";
        String targetPath = "E:\\蛋糕.ico";
        FileInputStream fileInputStream = null;
        FileOutputStream fileOutputStream = null;
        byte[] buf = new byte[8];
        int len = 0;
        try {
            fileInputStream = new FileInputStream(filePath);
            fileOutputStream = new FileOutputStream(targetPath,true);
            while((len = fileInputStream.read(buf)) != -1) {
                fileOutputStream.write(buf,0,len);
            }
        } catch (IOException e) {
            throw new RuntimeException(e);
        } finally {
            try {
                if (fileOutputStream != null) {
                    fileOutputStream.close();
                }
                if (fileInputStream != null) {
                    fileInputStream.close();
                }
            } catch (IOException e) {
                throw new RuntimeException(e);
            }
        }
    }
}
第02章 日期
Date date = new Date(); // 构造当前时间
System.out.println(date); // 输出 Mon Apr 03 21:08:41 CST 2023

long dateNum = 1000; // 表示毫秒值 1000-->1秒
Date date1 = new Date(dateNum); // 构造在1970年1月1日起毫秒数值的Date对象

System.out.println(date1); // 输出 Thu Jan 01 08:00:01 CST 1970
System.out.println(date.after(date1)); // 判断此Date时间是否在when时间之后 输出true
System.out.println(date.before(date1)); // 判断此Date时间是否在when时间之前 输出false
System.out.println(date.getTime()); // 获取此Date时间距离1970年1月1日的毫秒数 输出1680527613646

SimpleDateFormat format = new SimpleDateFormat("yyyy-MM-dd"); // 构造日期格式
Date date2 = format.parse("2002-08-09"); // 通过parse转换字符串为Date类型
System.out.println(format.format(date2)); // 通过format一个Date对象按照格式输出

// Calendar类扩展了Date类,提供了更完整的日期处理功能,包括日期、时间、时区等
// Calendar类是抽象类,使用getInstance方法获取实例对象
Calendar cal = Calendar.getInstance();
cal.setTime(date2); // 通过setTime来获得日期
// get(int field) 获取指定字段的值。指定字段主要包括year、month、day、hour、minute、second等
System.out.println(cal.get(Calendar.YEAR)); // 输出 2002 获取日期的年
System.out.println(cal.get(Calendar.MONTH)); // 获取月 注意月从0开始
// set(int field, int value) 设置指定字段的值
cal.set(Calendar.YEAR,2004); // 设置年为2004
System.out.println(format.format(cal.getTime())); // 输出 2004-08-09
// add(int field, int value) 对指定字段的值进行相加或相减
cal.add(Calendar.YEAR,1); // 对年份加1
System.out.println(format.format(cal.getTime())); // 输出 2005-08-09
// getTime() 返回Calendar实例对象对应的Date对象
Date date3 = cal.getTime(); // 通过getTime来获得Date对象

// 判断日期是否合法
try {
    format.setLenient(false);
    format.parse("2003-13-9");
    System.out.println("合法");
} catch (Exception e) {
    System.out.println("不合法");
}
第03章 反射
暂无
第04章 加密
MD5加密
此种方式加密不可逆
String password = "123456";
// 对123456字符串进行加密
password = DigestUtils.md5DigestAsHex(password.getBytes());
第05章 POI
所需依赖
<dependencies>
    <!-- Apache POI for Excel -->
    <dependency>
        <groupId>org.apache.poi</groupId>
        <artifactId>poi</artifactId>
        <version>3.9</version> <!-- 根据需要使用合适的版本号 -->
    </dependency>
    <dependency>
        <groupId>org.apache.poi</groupId>
        <artifactId>poi-ooxml</artifactId>
        <version>3.9</version> <!-- 根据需要使用合适的版本号 -->
    </dependency>
    <!--      如果需要操作 Word 文档,还可以添加以下依赖-->
    <!--      <dependency>-->
    <!--          <groupId>org.apache.poi</groupId>-->
    <!--          <artifactId>poi-ooxml-schemas</artifactId>-->
    <!--          <version>4.1.2</version> 根据需要使用合适的版本号 -->
    <!--      </dependency>-->
</dependencies>
写
Excel有两个版本
2003版
最多65536行即2的16次方
后缀是 .xls
import org.apache.poi.hssf.usermodel.HSSFWorkbook;
import org.apache.poi.ss.usermodel.Cell;
import org.apache.poi.ss.usermodel.Row;
import org.apache.poi.ss.usermodel.Sheet;
import org.apache.poi.ss.usermodel.Workbook;
import java.io.FileOutputStream;
public class Main {
    public static void main(String[] args) throws Exception {
        String PATH = "E:\\Java_Projects\\Cao\\Stu_POI";
        //创建工作薄 Workbook是一个接口
        Workbook workbook = new HSSFWorkbook();
        //用工作薄创建工作表
        Sheet sheet = workbook.createSheet("CaoOne");
        //用工作表创建行
        Row row1 = sheet.createRow(0);
        //创建单元格
        Cell cell1 = row1.createCell(0);
        //为第一个单元格赋值
        cell1.setCellValue("Cao");
        //生成表
        FileOutputStream fileOutputStream = new FileOutputStream(PATH + "Cao03.xls");
        //输出
        workbook.write(fileOutputStream);
        //关闭流
        fileOutputStream.close();
    }
}
2007版
最多1048576行即2的20次方
后缀是 .xlsx
import org.apache.poi.hssf.usermodel.HSSFWorkbook;
import org.apache.poi.ss.usermodel.Cell;
import org.apache.poi.ss.usermodel.Row;
import org.apache.poi.ss.usermodel.Sheet;
import org.apache.poi.ss.usermodel.Workbook;
import org.apache.poi.xssf.usermodel.XSSFWorkbook;
import java.io.FileOutputStream;
public class Main {
    public static void main(String[] args) throws Exception {
        String PATH = "E:\\Java_Projects\\Cao\\Stu_POI";
        //创建工作薄 Workbook是一个接口
        Workbook workbook = new XSSFWorkbook();
        //用工作薄创建工作表
        Sheet sheet = workbook.createSheet("CaoOne");
        //用工作表创建行
        Row row1 = sheet.createRow(0);
        //创建单元格
        Cell cell1 = row1.createCell(0);
        //为第一个单元格赋值
        cell1.setCellValue("Cao");
        //生成表
        FileOutputStream fileOutputStream = new FileOutputStream(PATH + "Cao07.xlsx");
        //输出
        workbook.write(fileOutputStream);
        //关闭流
        fileOutputStream.close();
    }
}
Java里面操作2003版本和2007版本两个区别
对象不同
2003:new HSSFWorkbook()
2007:new XSSFWorkbook()
后缀不同
2003:.xls
2007:.xlsx
Java操作Excel有四个对象
工作薄:Workbook
工作表:Sheet
行:Row
列:Cell
读
@org.junit.Test
public void TestRead() throws Exception {
    FileInputStream fileInputStream = new FileInputStream(PATH + "Test03.xls");
    Workbook workbook = new HSSFWorkbook(fileInputStream);
    Sheet sheet = workbook.getSheetAt(0);
    Row row = sheet.getRow(0);
    Cell cell = row.getCell(1);
    System.out.println(cell.getNumericCellValue());
    fileInputStream.close();
}
注意
注意 获取的类型不同要使用不同的方法
获取字符串:getStringCellValue()
获取数字:getNumericCellValue()
第06章 注解
常用注解
| 注解 | 功能 |
|---|---|
| @Override | 告诉编译器这个方法是覆盖父类的方法 |
| @Test | 测试 |
| @Deprecated | 不推荐使用该方法,已经过时 |
| @SuppressWarnings("all") | 抑制所有警告 |
| @Target 元注解 | 指定注解针对的地方 |
| @Documented 元注解 | 表示是否将注解生成在JavaDoc中 |
| @Inherited 元注解 | 子类可以继承父类的注解 |
| ElementType.TYPE | 针对类、接口 |
| ElementType.FIELD | 针对成员变量 |
| ElementType.METHOD | 针对成员方法 |
| ElementType.PARAMETER | 针对方法参数 |
| ElementType.CONSTRUCTOR | 针对构造器 |
| ElementType.PACKAGE | 针对包 |
| ElementType.ANNOTATION_TYPE | 针对注解 |
| @Retention 元注解 | 指定注解保留域 |
| RetentionPolicy.SOURCE | 源代码级别,由编译器处理,处理之后就不再保留 |
| RetentionPolicy.CLASS | 注解信息保留到类对应的class文件中 |
| RetentionPolicy.RUNTIME | 由JVM读取,运行时使用 |
例子
Cinit
package com.ctg.init;
import java.lang.annotation.*;
// 用在方法上
@Target(ElementType.METHOD)
@Retention(RetentionPolicy.RUNTIME)
public @interface Cinit {


}
Test
package com.ctg.init;
public class Test {
    @Cinit
    public void One() {
        System.out.println("One");
    }
    @Cinit
    public void Two() {
        System.out.println("Two");
    }
}
Main
package com.ctg.init;
import java.lang.reflect.InvocationTargetException;
import java.lang.reflect.Method;
public class Main {
    public static void main(String[] args) throws ClassNotFoundException, NoSuchMethodException, InvocationTargetException, InstantiationException, IllegalAccessException {
        // 指定扫描的类
        Class<?> clazz = Class.forName("com.ctg.init.Test");
        // 得到类中的所有方法
        Method[] methods = clazz.getMethods();
        // 对方法进行循环判断是否含有特定注解
        for (Method method : methods) {
            // 判定方法是否含有注解
            boolean flag = method.isAnnotationPresent(Cinit.class);
            // 含有注解则flag为true
            if (flag) {
                // 调用其它方法
                PreMain.show();
                // 调用自身方法
                method.invoke(clazz.getConstructor(null).newInstance(null), null);
            }
        }
    }
}
注解的参数
package com.ctg.init;
import java.lang.annotation.*;
// 用在方法上
@Target(ElementType.METHOD)
@Retention(RetentionPolicy.RUNTIME)
public @interface Cinit {
    // 注解的参数 参数类型 参数名()
    String name() default "";
}
定义注解写参数了,用注解时必须写参数,可以在定义注解时使用默认值
第07章 JSON
JSON格式
{
  "name": "CaoWeiMin",
  "version": "1.0.0",
  "age": 3
}
第08章 多线程
进程:指运行中的程序
创建线程
继承Thread类 重写run方法
Thread类实现了Runnable接口中的run方法
import java.util.Random;
public class Main {
    public static void main(String[] args) {
        Cat cat = new Cat();
        cat.start();
        // 当main线程重创建一个子线程main线程不会阻塞,会继续执行
        System.out.println("继续执行");
    }
}
class Cat extends Thread {
    @Override
    public void run() {
        int num = 0;
        while (true) {
            String name = Thread.currentThread().getName();
            System.out.println("汪汪汪" + (++num) + " " + name);
            try {
                Thread.sleep(new Random().nextInt(1000));
            } catch (InterruptedException e) {
                throw new RuntimeException(e);
            }
        }
    }
}
休眠一秒: Thread.sleep(1000);
获取当前线程名称:Thread.currentThread().getName()
不直接调用run方法的原因:直接调用run方法只是普通的调用方法,而不会开启一个线程,main方法中会等run方法结束之后才继续执行。这样就不是真正的线程。
实现Runnable接口 重写run方法
Java是单继承多实现,如果实现线程的类继承了别的类,则需要使用这种方式实现多线程。
public class Thread2 {
    public static void main(String[] args) {
        Dog dog = new Dog();
        Thread thread = new Thread(dog);
        thread.start();
    }
}
class Dog implements Runnable {
    @Override
    public void run() {
        int num = 0;
        while(true) {
            System.out.println("hi " + (++num));
            try {
                Thread.sleep(1000);
            } catch (InterruptedException e) {
                throw new RuntimeException(e);
            }
        }
    }
}
不能用Dog调用start方法,而是使用代理模式用Thread来调用start方法。
线程终止
标志位法
public class Thread2 {
    public static void main(String[] args) throws InterruptedException {
        Dog dog = new Dog();
        Thread thread = new Thread(dog);
        thread.start();
        // 休息五秒然后让线程终止
        Thread.sleep(1000*5);
        dog.setFlag(false);
    }
}
class Dog implements Runnable
{
    private boolean flag = true;
    @Override
    public void run() {
        int num = 0;
        while(flag) {
            System.out.println("hi " + (++num));
            try {
                Thread.sleep(1000);
            } catch (InterruptedException e) {
                throw new RuntimeException(e);
            }
        }
    }
    public void setFlag(boolean flag) {
        this.flag = flag;
    }
}
第09章 Hutool
所需依赖
<dependency>
    <groupId>cn.hutool</groupId>
    <artifactId>hutool-all</artifactId>
    <version>5.8.16</version>
</dependency>
// 通过公历构建
ChineseDate chineseDate = new ChineseDate(DateUtil.parseDate("2023-09-04"));
// 输出为 癸卯兔年 七月二十
System.out.println(chineseDate);

// 计算两个日期之间的天数
DateBetween datebetween = new DateBetween(date1,date);
// 输出为 您2023年的生日已经过去18天10小时12分22秒602毫秒您2023年的生日已经过去18天10小时12分22秒602毫秒
System.out.println("您"+year+"年的生日已经过去"+datebetween);
第10章 Lambda
Lambda表达式可以用于函数式接口(只有一个抽象方法的接口)
语法:(参数,参数)->代码逻辑
如 (a,b)-> a+b
interface MathOperation  {
    int operate(int a, int b);
}
public class LambdaExample  {
    public static void main(String[] args)  {
        MathOperation add = (a, b) -> a + b;
        MathOperation subtract = (a, b) -> a - b;

        System.out.println("Addition: " + add.operate(10, 5));
        System.out.println("Subtraction: " + subtract.operate(10, 5));
    }
}
例一 集合遍历
List<String> list = Arrays.asList("Cao","Wei","Min");
// list.forEach(s -> System.out.println(s));
list.forEach(System.out::println);
例二 过滤
List<String> list = Arrays.asList("Cao","Wei","Min");
// 把list中开头是"C"的元素放入到list1中
List<String> list1 = list.stream()
        .filter(s -> s.startsWith("C"))
        .collect(Collectors.toList());
例三 遍历长度
List<String> list = Arrays.asList("Cao","Wei","Min");
// 求出list中所有元素的长度放入到list1中
List<Integer> list1 = list.stream()
        .map(String::length)
        .collect(Collectors.toList());
例四 求和
List<Integer> list = Arrays.asList(1,2,3,4,5);
// 求出list中所有元素的和
int sum = list.stream().reduce(0, Integer::sum);
例五 分组
List<String> list = Arrays.asList("Caoo","Weiii","Min");
// 按照list中元素的长度进行分组
Map<Integer,List<String>> map = list.stream()
        .collect(Collectors.groupingBy(String::length));
第11章 JWT令牌
什么是JWT
JWT (JSON Web Token) :通过数字签名的方式,以JSON对象为载体,在不同服务终端之间安全的传输信息
JWT有什么用
JWT最常用的场景就是授权认证,一旦用户登录,后续每个请求都将包含JWT,系统在每次处理用户请求的之前,都要先进行JWT安全校验,通过之后再进行处理。
JWT的组成
JWT由三部分组成,用 "."进行拼接
三部分分别是
Header
{
  'typ': 'JWT',
  'alg': 'Hs256' //算法(加密算法)名称
}

Payload //信息内容
{
  "sub": '1234567890',
  "name": 'john',
  "admin": true
}

Signature //签名
JWT依赖
<dependencies>
<dependency>
<groupId>io.jsonwebtoken</groupId>
<artifactId>jjwt</artifactId>
<version>0.9.1</version>
</dependency>
<!-- JDK1.8不用加以下依赖-->
<!-- <dependency>-->
<!-- <groupId>io.jsonwebtoken</groupId>-->
<!-- <artifactId>jjwt-api</artifactId>-->
<!-- <version>0.11.2</version> <!– 使用最新版本 –>-->
<!-- </dependency>-->
<!-- <dependency>-->
<!-- <groupId>io.jsonwebtoken</groupId>-->
<!-- <artifactId>jjwt-impl</artifactId>-->
<!-- <version>0.11.2</version> <!– 使用最新版本 –>-->
<!-- <scope>runtime</scope>-->
<!-- </dependency>-->
<!-- <dependency>-->
<!-- <groupId>io.jsonwebtoken</groupId>-->
<!-- <artifactId>jjwt-jackson</artifactId>-->
<!-- <version>0.11.2</version> <!– 使用最新版本 –>-->
<!-- <scope>runtime</scope>-->
<!-- </dependency>-->
</dependencies>
JWT应用
package org.example;
import io.jsonwebtoken.*;
import java.util.Date;
import java.util.UUID;
public class Main {
    public static void main(String[] args) {
        long time = 1000*60*60*24;

        //根据signature进行解密
        String signature = "admin";

        JwtBuilder jwtBuilder = Jwts.builder();
        String jwtToken = jwtBuilder
                // Header
                .setHeaderParam("typ","JWT")
                .setHeaderParam("alg","HS256")
                // Payload
                .claim("username","tom")
                .claim("role","admin")
                // 设置有效时间
                .setExpiration(new Date(System.currentTimeMillis() + time))
                // 设置JWT的ID
                .setId(UUID.randomUUID().toString())
                // Signature
                .signWith(SignatureAlgorithm.HS256,signature)
                // 进行拼接
                .compact();
        System.out.println(jwtToken);
        // 解密
        JwtParser jwtParser = Jwts.parser();
        Jws<Claims> claimsJws = jwtParser.setSigningKey(signature).parseClaimsJws(jwtToken);
        Claims body = claimsJws.getBody();
        System.out.println(body.get("username"));
        System.out.println(body.get("role"));
        System.out.println(body.getId());
        System.out.println(body.getExpiration());
    }
}
第12章 链式编程
链式编程的核心思想是每次方法调用都返回对象本身
如StringBuilder
StringBuilder sb = new StringBuilder();
sb.append("Hello").append("World!");
例子
public class Person {
    private String name;
    private int age;
    private String address;
    public Person setName(String name) {
        this.name = name;
        return this;
    }
    public Person setAge(int age) {
        this.age = age;
        return this;
    }
    public Person setAddress(String address) {
        this.address = address;
        return this;
    }
    public static void main(String[] args) {
        Person person = new Person()
                .setName("Alice")
                .setAge(30)
                .setAddress("123 Main St");
    }
}
第13章 动态代理
JDK动态代理
这种方式的动态代理需要有接口
package com.ctg.Aop;
import java.lang.reflect.InvocationHandler;
import java.lang.reflect.Method;
import java.lang.reflect.Proxy;
interface UserDao {
    void addUser();
    void deleteUser();
}
class UserDaoImpl implements UserDao {
    public void addUser() {
        System.out.println("添加用户");
    }
    public void deleteUser() {
        System.out.println("删除用户");
    }
}
class MyAspect {
    public void check_Permissions() {
        System.out.println("模拟检查权限");
    }
    public void log() {
        System.out.println("模拟记录日志");
    }
}
class MyProxy implements InvocationHandler {
    private UserDao userDao;
    public Object createProxy(UserDao userDao) {
        this.userDao = userDao;
        ClassLoader classLoader = MyProxy.class.getClassLoader();
        Class<?>[] interfaces = userDao.getClass().getInterfaces();
        Object obj = Proxy.newProxyInstance(classLoader, interfaces, this);
        return obj;
    }
    @Override
    public Object invoke(Object proxy, Method method, Object[] args) throws Throwable {
        MyAspect myAspect = new MyAspect();
        //增强功能
        myAspect.check_Permissions();
        //原有功能实现
        Object obj = method.invoke(userDao, args);
        //增强功能
        myAspect.log();
        return obj;
    }
}
public class Main {
    public static void main(String[] args) {
        MyProxy myProxy = new MyProxy();
        UserDao userDao = new UserDaoImpl();
        UserDao proxy = (UserDao) myProxy.createProxy(userDao);
        proxy.addUser();
    }
}
基于注解的AOP实现
| 元素 | 描述 |
|---|---|
| @Aspect | 配置切面 |
| @Pointcut | 配置切点 |
| @Before | 配置前置通知 |
| @After | 配置后置通知 |
| @Around | 配置环绕方式 |
| @AfterReturning | 配置返回通知 |
| @AfterThrowing | 配置异常通知 |
package com.sky.aspect;
import org.aspectj.lang.JoinPoint;
import org.aspectj.lang.annotation.Aspect;
import org.aspectj.lang.annotation.Before;
import org.aspectj.lang.annotation.Pointcut;
/**
 * 自定义切面
 */
@Aspect
public class AutoFillAspect {
    /**
     * 切入点
     */
    @Pointcut("execution(* com.sky.mapper.*.*(..))") // 扫描的接口位置
    public void autoFillPointCut(){}
    /**
     * 前置通知,在通知中进行公共字段的赋值
     */
    @Before("autoFillPointCut()") // 和上面的空方法一样
    public void autoFill(JoinPoint joinPoint) {
        System.out.println("before...");
    }
}
第14章 Swagger
Java Swagger
Knife4j是Java MVC框架集成Swagger生成API文档的增强解决方案
所需依赖
<dependency>
    <groupId>com.github.xiaoymin</groupId>
    <artifactId>knife4j-spring-boot-starter</artifactId>
    <version>3.0.2</version>
</dependency>
配置类
@Bean
public Docket docket() {
    ApiInfo apiInfo = new ApiInfoBuilder()
            .title("xxx项目接口文档")
            .version("2.0")
            .description("xxx项目接口文档")
            .build();
    Docket docket = new Docket(DocumentationType.SWAGGER_2)
            .apiInfo(apiInfo)
            .select()
            // 指定需要扫描的包一般是controller包
            .apis(RequestHandlerSelectors.basePackage("com.sky.controller"))
            .paths(PathSelectors.any())
            .build();
    return docket;
}
注意
上述com.sky.controller根据项目的不同更改
设置静态资源映射,否则接口文档页面无法访问
/**
 * 设置静态资源映射
 * @param registry
 */
protected void addResourceHandlers(ResourceHandlerRegistry registry) {
    log.info("开始设置静态资源映射...");
    registry.addResourceHandler("/doc.html").addResourceLocations("classpath:/META-INF/resources/");
    registry.addResourceHandler("/webjars/**").addResourceLocations("classpath:/META-INF/resources/webjars/");
}
访问接口文档网址:http://localhost:8080/doc.html#/home
注意
上述代码中的"/doc.html"根据需要自己更改, 同时访问网址中的/doc.html也需要更改
四类辅助注解:
| 注解 | 说明 |
|---|---|
| @Api | 用在类上,例如Controller,表示对类的说明 |
| @ApiModel | 用在类上,例如entity、DTO、VO |
| @ApiModelProperty | 用在属性上,描述属性信息 |
| @ApiOperation | 用在方法上,例如Controller的方法,说明方法的用途、作用 |
用法
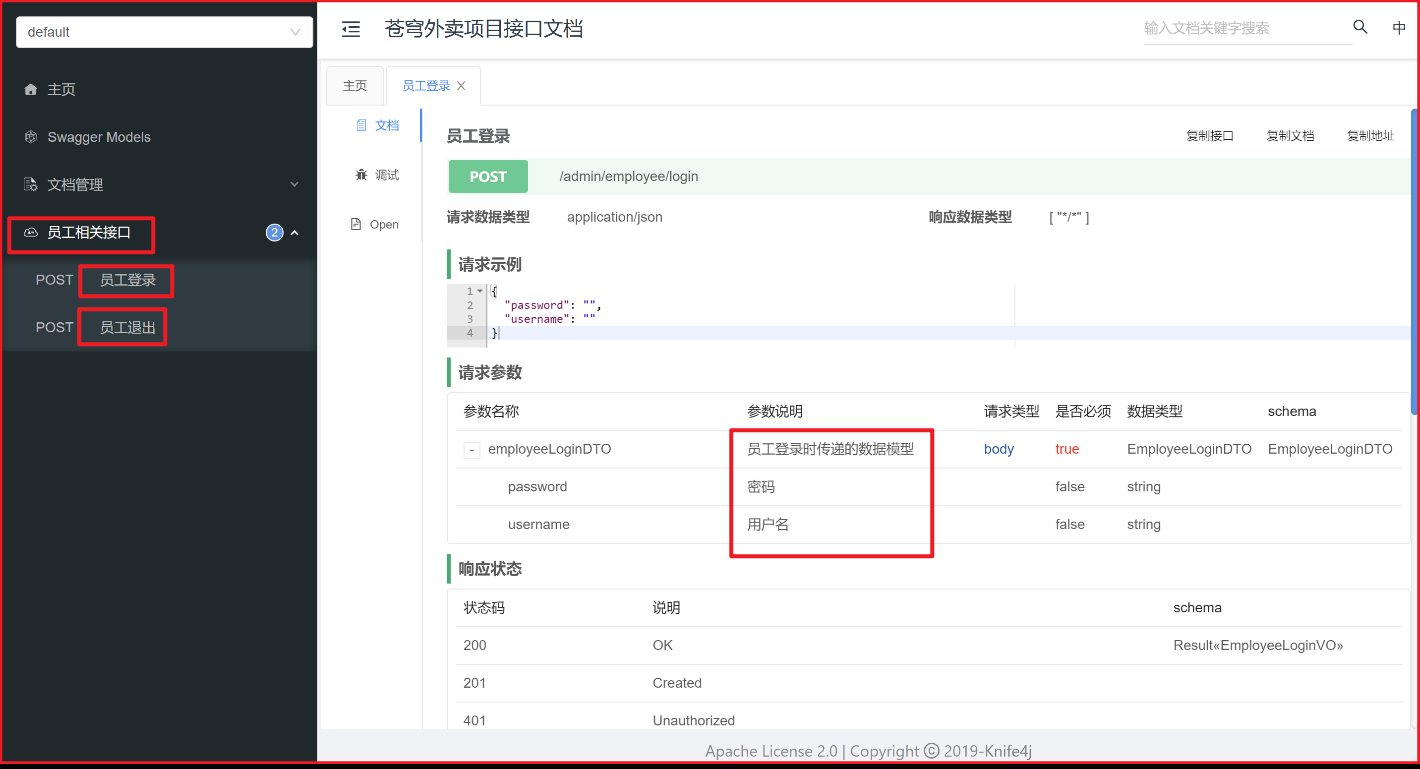
@Api(tags = "员工相关接口")
public class EmployeeController
@ApiOperation(value = "员工登录")
public Result<EmployeeLoginVO> login(@RequestBody EmployeeLoginDTO employeeLoginDTO)
@Data
@ApiModel(description = "员工登录时传递的数据模型")
public class EmployeeLoginDTO implements Serializable {
    @ApiModelProperty("用户名")
    private String username;
    @ApiModelProperty("密码")
    private String password;
}
使用注解之后的效果
Swagger官方文档
第15章 Porperties
// 读取
// 1. 创建Properties对象
Properties properties = new Properties();
// 2. 加载指定配置文件
properties.load(new FileReader("src\\mysql.properties"));
// 3. 把k-v显示在控制台
properties.list(System.out);
// 4. 根据key获取对应的值
String user = properties.getProperty("user");
System.out.println(user);
// 修改
// 1. 创建Properties对象
Properties properties = new Properties();
// 2. 创建/修改配置文件
properties.setProperty("charset", "utf-8");
properties.setProperty("user", "tom");
properties.setProperty("pwd", "123456789");
// null 表示注释为空 可以加入注释内容  "注释"
properties.store(new FileOutputStream("src\\mysql2.properties"), null);
第17章 匿名内部类
匿名内部类的前提
必须是类或者接口,里面只有一个方法。
匿名内部类有一些限制和特点
- 它们不能有构造方法,因为它们没有类名,只能通过实例初始化块来进行初始化操作。
- 它们可以扩展一个类或实现一个接口,但不能同时扩展类和实现接口。
- 它们只能在创建它们的方法或代码块中使用,通常用于局部的、简短的实现。
public interface Greeting  {
    void greet();
}
public class AnonymousInnerClassExample {
    public static void main(String[] args) {
        Greeting englishGreeting = new Greeting() {
            @Override
            public void greet() {
                System.out.println("Hello!");
            }
        };
        Greeting frenchGreeting = new Greeting() {
            @Override
            public void greet() {
                System.out.println("Bonjour!");
            }
        };
        englishGreeting.greet();
        frenchGreeting.greet();
    }
}
第18章 Other
DTO
当前端提交的数据和实体类中对应的属性差别比较大时,建议使用DTO来封装数据
日期格式化
@JsonFormat(pattern = "yyyy-MM-dd HH:mm:ss")
private LocalDateTime createTime;
ThreadLocal
ThreadLocal为每一个线程提供一份存储空间,具有线程隔离效果,只有在线程内才能获取到对应的值,线程外则不能访问。
常用方法
常常被包装成一个工具类,其作用是在同一个线程内存储某个值使得可以在同一个线程内不同位置使用改值。
public class BaseContext {
    public static ThreadLocal<Long> threadLocal = new ThreadLocal<>();
    public static void setCurrentId(Long id) {
        threadLocal.set(id);
    }
    public static Long getCurrentId() {
        return threadLocal.get();
    }
    public static void removeCurrentId() {
        threadLocal.remove();
    }
}
对象属性拷贝
有两个对象 A B 其中A对象的属性B对象都有。将A对象的全部属性赋值给B对象则可以使用对象属性拷贝。
BeanUtils.copyProperties(employeeDTO,employee);
注意
注意两个对象中的属性名字要一致。
Get和Post请求方式
区别:Get把参数包含在URL中,Post通过Request Body传递参数。Get是从服务器上获取数据,Post是向服务器传送数据。
Get方式比Post方式快的原因:Post请求包含更多的请求头,另外Post在真正接收数据之前会先将请求头发送给服务器进行确认,然后才真正发送数据。
1.get方式的安全性较Post方式要差些,包含机密信息的话,建议用Post数据提交方式;
2.在做数据查询时,建议用Get方式;而在做数据添加、修改或删除时,建议用Post方式;